Sunday, November 29, 2015

Custom Resolver – Why it's important to deploy it on both CMS and Publisher Servers ?

Recently, We developed a Custom Resolver which deletes the dependent pages from the package, while publishing a component dynamically. 
The Custom Resolver actually overrides the default OOB resolver, more details could be found here.
  
Basically resolving is a process in which publisher identifies the dependent items, which are supposed to publish with the published item. It is a part of overall publishing process and happens before rendering sub-process. 
Since we are overriding the resolving process, it's obvious to deploy the Custom Resolver on the server where publisher runs. 

In our case, we had a separate publishing server, so we deployed the custom resolver to the publisher server. And it started working as expected by not including the dependent pages while publishing the components.

But then we noticed one issue, On publishing a component, in the publishing dialog on clicking “Show Items to Publish” button the dependent pages were still showing. 


And it was confusing content editors that dependent pages are being published and resolver is not working. Though it was working actually and it's just the dependent pages were listed in the publish dialog.

The issue occurred because the “Show Items to Publish” button uses resolver on CMS server not on Publisher server. And since we didn't deploy our custom resolver to CMS server the default resolver was running there.

So to fix the issue, we needed to deploy our custom resolver on CMS server as well so that it overrides the default behavior of the resolver. 
And once we deployed the custom resolver to CMS server, the issue was resolved.


Friday, September 11, 2015

My First Alchemy Plugin - Publication Panel Search

Over the past few weeks, I have been noticing these four words "My First Alchemy Plugin" many places in the SDL community. So in my free time, I started my first Alchemy plugin as well and believe me it is a kind of addiction. Once you start it, you get involved with it more and more, so many plugin ideas starts hitting your mind, you don't mind waking up at 3 am to finish up your plugin. hmmm.. it's like Coke-en my friends :)

To start to build an Alchemy plugin, I reached out to the quick start guide at http://a4t-api.alchemywebstore.com, and after setting the project and test deployment to my local Tridion environment, it was just coding in Javascript (using Anguilla) all the way until my plugin was finished.

Coming to my plugin, what is this all about?

So I was working for a client, who has 300+ publications to manage in Tridion and it is always a pain to navigate to the different publications in a "230 x 275" GUI box, using mouse. You always need be alert to spot your publication while scrolling, because it does pass in a split second. This goes even worse when you operate on a remote system and there is some lagging involved.
Imagine about a customer having some 1000+ publications, now who wants to be Tridion content editor ? :)

So to address this issue, I developed an alchemy plugin named "Publication Panel Search". The plugin introduces a Search Box in the publication panel as shown below in the image. On typing in the search box, the publication panel gets updated and publications are filtered based on the search string. So no more scrolling to find a publication :)


To summarize it in technical terms:

  1. Extend the dashboard resource
  2. On dashboard load event, get the tree control by  var treeControl = $display.getView().getTreeControl();
  3. Add event handler function "AddSearchBox" on "Draw" event of the tree control. like: $evt.addEventHandler(treeControl, "draw", addSearchBox); where addSearchBox function is responsible to add the search box.

The plugin can be downloaded from Alchemy Web Store and after installing on CMS, it's ready to use. It requires Alchemy as a prerequisite on your CMS server.

If you want to have a look at the plugin code, I've put it on Github here at https://github.com/saurabhgangwar/Alchemy-PublicationPanelSearch .

Thanks

Wednesday, August 19, 2015

DXA Installation - A Tip

This blog post is to fix the Error "No valid localizations are active for this site. Check the site log, and that you have the right localization IDs configured in cd_dynamic_conf.xml", While Browsing a DXA website for the first time.


By looking at the error, it's looks like a configuration issue in "cd_dynamic_conf.xml", but it's more than that.

To fix the issue:

Check the “cd_dynamic_conf.xml” and make sure that right localization ids for publications configured

Browse the "cd_dynamic_conf.xml" from location "{WebsiteRootDirectory\bin\config}", make sure you have your website entry in there as below:

<Publications>
    <Publication Id="123">
       <Host Domain="{domain}" Port="{port}" Protocol="http" Path="" />
     </Publication>

</Publications>

"123" is the publication id (in tridion) of your website 
"{domain}" is the domain for your website
"{port}" is the port


Binaries are set to publish to broker database

Make sure the binaries (multimedia files) are set to publish to the "Broker" database, In the storage config file.

The DXA website’s Application Pool Identity must have “write” permissions on the root directory of the website.

So when a page of a DXA website is requested for the very first time. DXA tries to creates a directory “BinaryData” in the root directory of the website. This directory is used to hold the binary data used in the website. So when a page is requested, DXA copies the binary data (used on the page) from boker database to this folder. And use the binaries for subsequent requests of the page. 
So to create a directory inside the website root and to copy a binary files to the directory from broker DB, The website’s Application Pool Identity must have “write” permissions on the folder.


Tuesday, August 11, 2015

First SDL Professional Meet in India

On August 1st 2015, I attended the first ever SDL Professional Meet in India. It was really great to see SDL professionals from all over India there. We gathered at the SDL Mumbai Office using some wonderful facilities there. The conference area especially was exceptional. A big thanks to SDL Mumbai for that.

Introduction

The event started with a welcome note from Tejas & Vikas followed by the individual introductions. It was really nice to get to know everyone. Alvin, Raj, Mark, Tejas, Venu, Jatinder Sodhi and many more... 


SDL Evolution and SDL WEB 8.1

Yep, presentations time... Starting with a session from Alvin, which was all about SDL's history, evolution and road map.
He also described what's coming in the new version of Tridion, which will no longer be known as Tridion but SDL Web (version 8.1). It was really nice to discuss, where we are and what more we will have moving forward.


DXA Basics from Raj

Following the session from Alvin, Raj went through the basics of DXA. He discussed the structure and the usability of DXA and also went through the out of the box modules that come with it. 


Alchemy!!! Alchemy!!!

I was really excited to present Alchemy4Tridion, the game changer from Alex Klock. We discussed many things from installing Alchemy to creating an Alchemy plugin in visual studio, including framework basics and core Alchemy functionality.
 I also introduced the Alchemy webstore, where the Alchemy plugins can be uploaded and managed.It felt really good to see the response from the people out there. Thanks guys and girls.


Vikas with DD4T

Vikas turned out with a great DD4T presentation and covered the basics with what's in store for DD4T 2.0.
It was a really nice to learn about DD4T with java. He also covered "DD4T Vs DXA", showing how both are related and different as the same time. 

Piyush Jain Steels the Show

Hey! Who are you man?? Nowhere in the agenda :) So here arrives Piyush Jain with some really good points on where SDL is losing the race with it's competitors. He compared SDL Tridion with other leading CMS with regards to out of the box functionality and summarized it very well how customers are paying additional money in customizing Tridion.

Targeting Smart in Venu's way

Venu touched on Smart Target and explained how the product could be used to personalized websites. He summarized Fredhopper pretty well and presented how Smart Target connects it to Tridion. Good to learn.


That's it chaps

Other then some general free time discussions in between, Alvin concluded the presentations presenting SDL Translation Manager. We had a lucky draw for two free Tridion Certifications and Mukesh Kumar and Sumit Sabberwal emerged luckiest among all of us. I still feel Mark did some trick picking those tickets from the bowl. hahaha..
And of course, we collected around INR 40,000 in the form of registration fees. SDL Foundation will be using for some charity work. Awesome!!!

Lets get drunk!!! Not really :)

Wait a minute, did I hear it right?? Nobody goes with alcohol here ??? Awww alright, lets concentrate on some food then. 


A day after...

At Kharghar hills

In Summary

Other than learning through the presentations, the event provided a platform to the SDL professionals from India to get to know each other. It was also a launch pad to have other events like this in India down the road. A big thanks to all the guys and girls, who turned up and made it a successful event. Really enjoyed being with you, see you later ...


Monday, July 13, 2015

Installing Alchemy Plugins for Tridion


Before installing an Alchemy Plugin, you must install Alchemy on your CMS server. Once finished, an Alchemy Plugin could be installed in two ways:


1. First one is to access the web store inside your Tridion GUI and install it clicking on install button. 
  •     Go to the Web Store by clicking the tab "web store" on Alchemy landing page, Search for the plugin you want to install.


  •     On the search result page, click the plugin you want to install


  • It will redirect you to the Plugin page, Locate to the "Install Plugin" button and click it

  • Watch the Tridion notifications about the progress


  • Great, your Plugin is installed and ready to use 


2. The other way to install a Plugin is to go to  
www.alchemywebstore.com and download the plugin (a4t file) and drag and drop it on the Alchemy landing page inside the Tridion GUI.


Installing Alchemy for Tridion (A4T)

As a Tridion developers we all know, Developing a Tridion GUI Extension is not a piece of cake. Form developing the code to the configuration, It's a complex process that requires some good technical skills and time.


So here comes Alex Klock and his team to rescue. They developed a system called Alchemy at Content Bloom, and the Beta version is announced recently.


Alchemy is basically a system set to revolutionize the way Tridion Extensions are built and installed. The system comprises of a open source extension framework to develop the extension plugins and a web store to upload/download and manage plugins.

So to use the Alchemy Plugins, First We need to install this awesome thing named Alchemy.


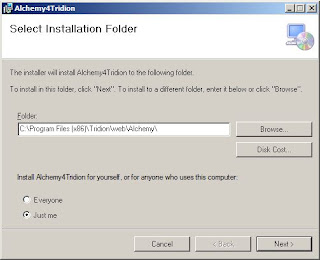
  • Run the installer on your CMS server

 Installation wizard starts


Specify the installation location for Alchemy


Specify the system admin credentials (Optional) needed for plugins like "Servicer", which performs some system administrative task like restating a window service. If you skip this, you can update this information post-install as well, these are stored in the "impersonation" node of the Alchemy.xml file found at: [Tridion Home]\web\Alchemy\Configuration\ 


Click Close once installation is complete


  • Refresh Tridion in browser. Boom!!! Welcome to the world of alchemy.


  • Click on the Alchemy link in left panel, it will show you the Alchemy landing page. And yeah, you are all set to install Alchemy plugins for the environment. 


Monday, May 4, 2015

Publishing Category keyword hierarchy as XML

Tridion Bite : Fetch taxonomies in RDF/OWL-Lite format from cms to improve performance.

Many a times, we need category keywords hierarchy as xml file on presentation server for different purposes. The common way to implement it in templating is to iterate through the categories and keywords structure to produce a xml document and add it as output.

This works great but this doesn't result in a good publishing performance. Especially if the publishing threads are limited and so other items keep waiting for publish in the queue.

So here is an alternative approach, which quite faster as compared to the previous one:
  • Use Repository.GetTaxonomiesOwl() method to get the taxonomies in a repository in RDF/OWL-Lite format.
  • Write a xslt to apply on the taxonomies results and add it as “Embedded Resource” in your templating solution.
  • Transform the xml (RDF/OWL-Lite) using xslt and add the result to the output.


1. Use Repository.GetTaxonomiesOwl() method to get the taxonomies in this Repository in RDF/OWL-Lite format:

We get the results like below:


from the cms structure:


2. Write xslt  and add it as “Embedded Resource” in your templating solution:

The xslt code:

<?xml version="1.0"?>
<xsl:stylesheet version="1.0"
xmlns:xsl="http://www.w3.org/1999/XSL/Transform" xmlns:owl="http://www.w3.org/2002/07/owl#" xmlns:rdf="http://www.w3.org/1999/02/22-rdf-syntax-ns#" xmlns:rdfs="http://www.w3.org/2000/01/rdf-schema#" xmlns:xsd="http://www.w3.org/2001/XMLSchema#" xmlns:tcmt="http://www.tridion.com/ContentManager/5.2/Taxonomies#" xmlns:tcmc="tcm:0-9-1/Categories#">

  <xsl:template match="/rdf:RDF">
    <publication>
    <xsl:apply-templates select="tcmt:Taxonomy"/>
    </publication>
  </xsl:template>

  <xsl:template match="tcmt:Taxonomy">
    <category>
      <xsl:attribute name="id" >
        <xsl:value-of select="@rdf:about" />
      </xsl:attribute>
      <xsl:for-each select="tcmt:rootKeyword">
        <xsl:call-template name="keyword">
          <xsl:with-param name="tcmId" select="@rdf:resource"/>
         </xsl:call-template>
      </xsl:for-each>
    </category>
  </xsl:template>

  <xsl:template name="keyword">
    <xsl:param name = "tcmId" />
        <keyword>
          <xsl:attribute name="id" >
            <xsl:value-of select="$tcmId" />
          </xsl:attribute>
          <xsl:attribute name="title" >
            <xsl:value-of select="/rdf:RDF/*[@rdf:about = $tcmId]/rdfs:label" />
          </xsl:attribute>
          <xsl:for-each select="/rdf:RDF/*[@rdf:about = $tcmId]/tcmt:childKeyword">
            <xsl:call-template name="keyword">
              <xsl:with-param name="tcmId" select="@rdf:resource"/>
            </xsl:call-template>
          </xsl:for-each>
        </keyword>
  </xsl:template>
</xsl:stylesheet>

Add it as "OwlTaxonomies.xml" to the solution as below:


Make the file a embedded resource by  selecting build action to "Embedded Resource" in file properties:


3. Transform the xml (RDF/OWL-Lite) using xslt and add the result to the output (The Example Code):


[TcmTemplateTitle("Generate Taxonomy Xml")]
    class GenerateTaxonomyXml : TemplateBase
    {

        /// <summary>
        /// Main function for TBB. Starting point of TBB code.
        /// </summary>
        public override void Transform(Engine engine, Package package)
        {
            // Call the base function to initialize the engine and package objects.
            Initialize(engine, package);
            Publication pub = GetPublication();
            var repo = GetPublication() as Repository;
            TaxonomiesOwlFilter fltr = new TaxonomiesOwlFilter(repo.Session);
            var taxonomies = repo.GetTaxonomiesOwl();

            // Load the style sheet.
            XslCompiledTransform xslTransformer = new XslCompiledTransform();

            //load the Xsl from the assembly
            Stream xslStream = LoadResourceAsStream("MyTest.TemplateBuildingBlocks.Resources.OwlTaxonomies.xslt");
            xslTransformer.Load(XmlReader.Create(xslStream));

            string strXmlListItems = taxonomies.OuterXml;
            StringReader srXml = new StringReader(strXmlListItems);
            XmlReader readerXml = new XmlTextReader(srXml);

            // Execute the transform and output the results to a file.
            StringWriter sw = new StringWriter();
            XmlWriter writer = new XmlTextWriter(sw);
            xslTransformer.Transform(readerXml, writer);

            package.PushItem("Output", package.CreateStringItem(ContentType.Xml, sw.ToString()));
        }

        private Stream LoadResourceAsStream(string resourceName)
        {
            var assembly = Assembly.GetExecutingAssembly();
            return assembly.GetManifestResourceStream(resourceName);
        }

    }

The Output:

<?xml version="1.0" encoding="utf-8"?>
<publication xmlns:owl="http://www.w3.org/2002/07/owl#" xmlns:rdf="http://www.w3.org/1999/02/22-rdf-syntax-ns#" xmlns:rdfs="http://www.w3.org/2000/01/rdf-schema#" xmlns:xsd="http://www.w3.org/2001/XMLSchema#" xmlns:tcmt="http://www.tridion.com/ContentManager/5.2/Taxonomies#" xmlns:tcmc="tcm:0-9-1/Categories#">
  <category id="tcm:9-5039-512">
    <keyword id="tcm:9-5256-1024" title="Level1 - Test Keyword1">
      <keyword id="tcm:9-5257-1024" title="Level2 - Test Keyword1" />
    </keyword>
    <keyword id="tcm:9-5258-1024" title="Level1 - Test Keyword2 - (localized)">
      <keyword id="tcm:9-5259-1024" title="Level2 - Test Keyword2" />
    </keyword>
    <keyword id="tcm:9-5260-1024" title="Local Keyword" />
  </category>
  <category id="tcm:9-5040-512" />
  <category id="tcm:9-5041-512" />
</publication>