Showing posts with label Tridion. Show all posts

Thursday, October 26, 2017

Forcing Workflow on Templates (Design Items) in Tridion

The main purpose of  Tridion Workflow is to audit content before it is published to a particular environment, but it is also important to audit the design changes before making those available for a end user on a particular environment. Without proper auditing wrong version of the layouts (and possibly JS functionality) could make all the way to Live application and can have all sorts of user experience issues.


Importance of Workflow Enforcement on Tridion Items:


When a tridion item is updated outside of the workflow or a new item created, item was set to approval status 'undefined'. With this 'undefined' approval status there was no restriction on publishing those items at all, means the item (content/template) which was yet to be approved by workflow process could be published.

To make sure any unaudited item (content/template) doesn't get published. Tridion provides OOB functionality to Enforce Workflow on Components and Templates.

In one of my previous blogs, I explained how to force workflow on Components. Here I am going to explain how you can force workflow on Templates (TBBs, CTs and PTs).


Forcing Workflow on Templates:


1. Enable workflow on the publication:
Before forcing workflow on the items, you should always enable the workflow on that particular publication otherwise new and updated items would be waiting forever for a workflow to be enforced, as user would not be able to trigger a workflow process on the templates.

To do so, open publication properties and inside workflow tab check the checkbox "Enable Workflow Process Associations in Shared Schemas and Structure Groups" and save the publication properties.


2. Force the workflow on design items:
To force workflow, open publication properties and inside workflow tab check the checkbox "Any changes made to a Template in this Publication require approval by a Bundle Workflow Process" and save the publication properties.


Once the workflow enforcement on templates is set on the publication, Now if you updates/creates template (or TBB) outside of workflow, Instead of being checked-in and available for use, a minor version of the template will be created in "Waiting for Workflow" state. To use this version, you must add it to a bundle and start the workflow on it. Once the workflow is finished, the minor version is converted to a major version and is ready for use.

Friday, June 2, 2017

Go To Location | Alchemy Plugin for SDL Web

At SDL Web Dev Summit 2017 in India, I got this opportunity to show & tell on "how to create a Alchemy Plugin in 30 mins". And I choose to build this simple "GoToLocation" Alchemy Plugin there.

This plugin adds a Ribbon Tool Bar Button 'Go To Location' to the Repository Local Items Views including Page, Component, Schema, Component Templates, Page Templates and Template Building Blocks. On clicking the button SDL Web redirects the user to the location of the item.

This plugin is useful in the situations when a user wants to navigate to the Item's location form the Item's View.

In case you missed the event, lets revisit the plugin again. So before we begin, get the plugin's code from here so that we both are on the same page.

Facts about the plugin:
  1. It is a Ribbon Toolbar Extension, which places a "Go To Location" button in the ribbon.
  2. It will be applicable to following views:
    • Component
    • Page
    • Schema
    • Page Templates
    • Component Templates
    • Template Building Blocks
  3. On clicking the button, a Command fires to take the control to the item's location.
  4. It needs to have following resources (Resource Group) available in Tridion
    • Image - to be applied on the button
    • CSS File - to define styling on the extension button
    • Command JS File - to define the command to be fired on button click

Lets visit the code against the above points:
  1. Open the file "Config\GoToLocationExtension.cs". you would notice that the class is extended with the base class "RibbonToolbarExtension". Doing this you instruct Alchemy Framework that your extension is a Ribbon Toolbar Extension.
  2. In the same file you would see the lines like Apply.ToView(Constants.Views.{ViewName}). The code is to apply the extension on different views.
  3. We always define the Tridion Commands in JS files and place it inside a fixed folder structure "Static/Commands". You can see we have "GotoLocationCommands.js" in there to define our command. In execute method of the command, we simply get the "GoTo" command defined in Anguilla Framework and execute it on selected item.
  4. Resources are generally supportive files needed in Tridion for your extension. These files are organized in a fixed structure in the project inside the "Static" folder.
    • Image: To apply an image, we need to add the image in the project inside the folder "Static/Images" so that it is available to use.
    • CSS File: This file contains all the styling we need to add to our extension and sits in "Static/Styles" folder. In this case we just want a background image for the ribbon bar button as styling. If you notice in the css file, we are applying the image on a element with the id "RibbonToolbarGoToLocationButton". The id is nothing but the Assign Id of the extension (defined in "GoToLocationExtension.cs" file), which ends up as a HTML element id for the extension. 
    • Command JS File:  The file is located at "Static/Commands" and contains the command as we mentioned in point 3.
Now when we created different pieces we need for the functioning of our extension, We need to instruct Alchemy Framework; what is what and how these are inter connected?
  1. Alchemy Framework needs to know about the commands your extension have and to define it, we create a class derived from "CommandSet" base class. The class "GoToLocationExtension.cs" could be spotted under "Config" folder, having the command added (defined in the Command JS File, the name must match)
  2. We must tell Alchemy, which resources are going to use for the extension and to define it, we create another class derived from "ResourceGroup" base class. This class adds all the Resource Files, Command Sets and other dependencies needed for the extension. The class can be found at "Config/GoToLocationResouceGroup.cs".
  3. Lastly tell Alchemy that the extension is dependent on the Resource Group we just created. To do so, add the line Dependencies.Add<GoToLocationResouceGroup>() to the extension class "Config\GoToLocationExtension.cs".
And that's it. All other properties in the code files are quite self explanatory. 
Now build the project, you get your .A4T alchemy file for the extension. yay!


Sunday, May 29, 2016

Title Translator | Alchemy Plugin for Tridion

I worked on a Tridion implementation for a client managing huge local content for their websites. One could imagine that local content is hardly anything to do with a developer, but he could be wrong. So at that client, with the content inside the localized components, the title of the items were also in local languages (at many places), specifically they had tons of local taxonomies with the local language titles. Now if any issues reported for a localized website, it was a nightmare for the developers to dig in to the content while investigating that issue because we developers knew only English language.

Few weeks ago, while looking at some of old work for that client that I remembered those days and that issue. So I decided to create a Alchemy Plugin called called Title Translator to address that issue, you can follow the link to Alchemy Web Store and download it from there.
This is really a simple plugin which uses SDL Translation API in background, all you need to do is get a SDL Translation API key, set the key in Plugin Configuration and you are ready to go. In the coming versions, I will try to include the support for Microsoft and Google translation as well.

To use the plugin, simply right click on a title in your CMS Filtered Item list or left-hand​ navigation panel and select 'Translate Title'. The updated title will show in the notification bar.


On the Technical side, This plugin is created using Alchemy Framework. The idea was pretty simple, create a context menu extension and on clicking it fire a command to show the translated title in notification bar.

The Code for the Plugin can be found here on Github. This basically have following building blocks:

  • TranslatorContextMenuExtension: This class holds information about your context menu extension. Other than specifying name and id, below are the important pieces of info it has:  
    • The order of your extension in the context menu.
    • Associated command to the context menu extension.
    • Dependent resource groups.
    • Which view, the extension applies to, In this extesnsion it applies to "DashboardView".
  • TranslatorCommandSet: The class is all about creating a command set from the commands specified in the JS files. We have only one command called "translate" and it is add to the commandset.
  • TranslatorResourceGroup: This class is used to tell alchemy, which resources (files/CommandSets) are you using in your extension. We have just one JS file named "TranslatorCommand.js" and one command set, so adding those in there.
  • TranslatorCommand.js file: This file holds the command code, which fires once "Translate Title" in context menu is clicked. The code basically sends the request to the SDL Machine Translation Service and gets back the translated title as an response and shows it in notification bar.
That's it chaps, go use it. And yeah, feel free to leave comments, questions, report bugs, improvements, pretty much anything related to it.


Thanks.

Wednesday, January 6, 2016

Tridion Custom Tools Example Projects – Event Handler

In the blogpost series of Tridion Custom Tools Example Projects, this blog covers the Event Handler Extension. The Example Code Project could be found here on GIT. I've also shared the Visual Studio Extension here, If you want to install the project template in visual studio for event handler.

An Event Handler is a piece of functionality that is triggered when a certain type of event happens to a certain Content Manager item, for example when a Component being saved.

In Technical terms, It is a .NET assembly that uses the Event System to hook into events occurring in the Content Manager.The Event System is part of the TOM.NET (.NET Tridion Object Model) API. 


To create an Event Handler, create a class that extends Tridion.ContentManager.Extensibility.TcmExtension. You then need to compile your Event Handler into an assembly (DLL) and register it.

Procedure (Copied From SDL Documentation)

  1. In Visual Studio, create a class that extends Tridion.ContentManager.Extensibility.TcmExtension. This class must have a unique class attribute, say,[TcmExtension("MyUniqueEventHandlerExtension")].
  2. In the constructor of this class, execute code that subscribes to one or more events using the following methods:
SubscribeAsync
Subscribe asynchronously to an event. Select this method if your Event Handler code does not affect the data being handled in the Content Manager. For example, if your Event Handler saves data to a backup system or a log file, you can select this method.
Subscribe
Subscribe synchronously to an event. Select this method if your Event Handler code changes the data being handled. For example, if your Event Handler analyzes a Component and then adds metadata to it, ensure that you select this method.
Both methods have the following signatures:
Subscribe<TSubject, TEvent>(TcmEventHandler<TSubject, TEvent> eventHandler, EventPhases phases, EventSubscriptionOrder order)
SubscribeAsync<TSubject, TEvent>(TcmEventHandler<TSubject, TEvent> eventHandler, EventPhases phases, EventSubscriptionOrder order)
where the parameters mean the following:
TSubject (type parameter)
This is the type(s) of the object you are checking events for. This can be any item of class Tridion.ContentManager.IdentifiableObject or any of its subclasses, which includes any kind of content item (such as Component, Schema or Target Group), organizational item (such as Folder or Structure Group) or system-wide object (such as User or Group).
TEvent (type parameter)
This indicates the type(s) of event that trigger this code if applied to an item of the object type specified in TSubject. This can be any event of classTridion.ContentManager.Extensibility.TcmEventArgs or any of its subclasses.
TcmEventHandler<TSubject, TEvent> eventHandler
The name of the method that contains the code you want to be triggered when the event occurs. This method should be contained in the same class and should have parameters that are the same as the type parameters of this Subscribe or SubscribeAsync method.
EventPhases phases
The exact moment during the event at which the event code should be triggered. Note that this parameter is an enum with FlagsAttribute, meaning that you can select multiple moments, which in turn means that a single event could trigger the same code multiple times.
EventSubscriptionOrder order
This optional parameter specifies when the event code should be executed if the same event triggers multiple Event Handlers.
  1. Now, in the same class, implement your event code in a method with the name specified in the eventHandler parameter of the Subscribe or SubscribeAsync method. In this method, you can perform any action you wish, including any type of querying, modification or other manipulation of items in the Content Manager. Include any namespace you need to access these items.
When you write this code, note the following:
    • You can make changes to the members of the TEvent parameter (the members are different depending on the event type) by exchanging information between Event Handlers.
    • When executed, the code you write may result in other event code being triggered.
    • From your event handling method, you can identify the specific user who triggered the event through the Session property of your first parameter of type <TSubject>. For example, if your method has a signature HandlerForSave(Component subject, SaveEventArgs args, EventPhases phase), get the name of the user by checking subject.Session.User.Title.
  1. Once you are satisfied with your code, shut down the following services on your Content Manager server:
    • IIS
    • Any Tridion-related COM+ services
    • If your code is related to publishing, the Publisher service of SDL Tridion
  2. Compile your class to a .NET assembly.
Note: If your event code contains a bug that raises an exception, it can cause the event that triggered it to hang. Especially if your event code is likely to be triggered very often, this can easily cause the system to freeze. Always test your event code before deploying it.
  1. Open the configuration file called Tridion.ContentManager.config, located in the config/ subfolder of %TRIDION_HOME% (defaults to C:\Program Files (x86)\Tridion\), in a plain-text or XML editor. Find the extensions element in this file. If the element is empty (that is, if it reads <extensions/>), replace it with<extensions></extensions>. Then add a line of the following format:
<add assemblyFileName="C:\Projects\Events\MyCustomEventHandlerExample\bin\Debug\MyCustomEventHandler.dll" />
where MyCustomEventHandler.dll is the full path and name of your compiled class. If the element was empty, the fragment should now read:
<extensions>
  <add assemblyFileName="C:\Projects\Events\MyCustomEventHandlerExample\bin\Debug\MyCustomEventHandler.dll" />
</extensions>
  1. Save and close Tridion.ContentManager.config.
  2. Restart the services you stopped.

Tuesday, January 5, 2016

Tridion Custom Tools Example Projects – Core Service (.NET)

In the series of blog posts for Tridion Custom Tools Example Projects, in this blog I am explaining to set up a simple core service project and sharing the Example Code. Also you can install a visual studio project template for the same, the VSIX file can be found here

The Core Service is a Web service that allows applications to interact with the Content Manager. For example, Content Manager clients such as Experience Manager and Content Manager Explorer interact with the Content Manager through the Core Service, and you can use the Core Service to integrate external systems with SDL Tridion.

Setting up the project (Using the built-in .NET client)

1. Open Visual Studio and create a project (Console or Web according to your need) .

2. Copy the  Tridion.ContentManager.CoreService.Client assembly from bin\client subdirectory of %TRIDION_HOME% (defaults to C:\Program Files (x86)\Tridion\) to a location.

3. Add a reference to the Tridion.ContentManager.CoreService.Client assembly in the project from the copy location.

4. Add references to System.ServiceModel and System.Runtime.Serialization assemblies.

5. In the same folder, find the file Tridion.ContentManager.CoreService.Client.config and copy the WCF endpoint configuration you find in that file into your application's configuration file.

6. Use Tridion.ContentManager.CoreService.Client namespace to create CoreServiceClient object.

Alternatively, one can also create a proxy client creating a service reference in to the project.

Creating the core service client object:

To interact with CM, we need a core service client object and to create it, Endpoints (defined in applications config file) are used. In WCF terms, an Endpoint is simple collection of Address, Binding and Contract.

There are three default bindings:  BasicHttpBinding (SOAP), WSHttpBinding (WCF) and NetTcpBinding (network). These are used to connect to the Core Service from your SOAP, WCF or network client. You can find more about the default bindings here.

Different types of core service clients are listed here, which are used for different purposes. In this code example I am using SessionAwareCoreServiceClient to interect with Tridion Content Manager. 

Once the core service client object is created, it can be used to interact with Tridion CM. Have a look at the example code here.

Monday, January 4, 2016

Tridion Custom Tools Example Projects – Custom Resolver

I noticed many questions on Tridion SE, where new developers face issues with setting up projects for Tridion Custom Tools. So in this series of blog posts I am sharing some code examples and extensions for the same.

To start with, I am explaining to set up the Custom Resolver. I've set up a simple Example Code Project and could be found here , I've also shared the the Visual Studio Extension for it, if anyone wants to install a project template for custom resolver it could be found here.


Setting up the project:


1. Create a library project in Visual studio.

2. Add the following dlls as reference:

  • Tridion.Common
  • Tridion.ContentManager
  • Tridion.ContentManager.Common
  • Tridion.ContentManager.Publishing
3. Create a class say “MyCustomResolver” by extending from interface “IResolver”, which is found in “Tridion.ContentManager.Publishing.Resolving” namespace.

4. Implement the method public void Resolve(IdentifiableObject item, ResolveInstruction instruction, PublishContext context, Tridion.Collections.ISet<ResolvedItem> resolvedItems)

5. Sign the Assembly with a Strong Name.

6. Build and add the assembly to GAC on CMS and Publisher Servers, In case you have a separate publisher server.


Installation Process (To be done on CMS and Publisher Boxes):


1. Copy the assembly “ExampleTridionCustomResolver.dll” in to the server.

2. Add the assembly to the GAC.

3. Open “Tridion.ContentManager.config” file from the path “%TridionInstall% \config”.

4. Locate xml element <add itemType="Tridion.ContentManager.ContentManagement.Component"> inside element <resolving> ---> <mappings>. Since we only want to override resolving behavior for components in this example.

5. Inside the child element <resolvers>, add element <add type=" ExampleTridionCustomResolver.MyCustomResolver" assembly=" ExampleTridionCustomResolver, Version=1.0.0.0, Culture=neutral, PublicKeyToken={PublicKeyToken}" /> as a LAST child.

6. Finally, save and close the Tridion.ContentManager.config file and from your list of Windows Services, restart all Windows services that start with Tridion Content Manager. Also restart IIS and the SDL Tridion Content Manager COM+ application. This applies your changes.

Sunday, November 29, 2015

Custom Resolver – Why it's important to deploy it on both CMS and Publisher Servers ?

Recently, We developed a Custom Resolver which deletes the dependent pages from the package, while publishing a component dynamically. 
The Custom Resolver actually overrides the default OOB resolver, more details could be found here.
  
Basically resolving is a process in which publisher identifies the dependent items, which are supposed to publish with the published item. It is a part of overall publishing process and happens before rendering sub-process. 
Since we are overriding the resolving process, it's obvious to deploy the Custom Resolver on the server where publisher runs. 

In our case, we had a separate publishing server, so we deployed the custom resolver to the publisher server. And it started working as expected by not including the dependent pages while publishing the components.

But then we noticed one issue, On publishing a component, in the publishing dialog on clicking “Show Items to Publish” button the dependent pages were still showing. 


And it was confusing content editors that dependent pages are being published and resolver is not working. Though it was working actually and it's just the dependent pages were listed in the publish dialog.

The issue occurred because the “Show Items to Publish” button uses resolver on CMS server not on Publisher server. And since we didn't deploy our custom resolver to CMS server the default resolver was running there.

So to fix the issue, we needed to deploy our custom resolver on CMS server as well so that it overrides the default behavior of the resolver. 
And once we deployed the custom resolver to CMS server, the issue was resolved.


Friday, September 11, 2015

My First Alchemy Plugin - Publication Panel Search

Over the past few weeks, I have been noticing these four words "My First Alchemy Plugin" many places in the SDL community. So in my free time, I started my first Alchemy plugin as well and believe me it is a kind of addiction. Once you start it, you get involved with it more and more, so many plugin ideas starts hitting your mind, you don't mind waking up at 3 am to finish up your plugin. hmmm.. it's like Coke-en my friends :)

To start to build an Alchemy plugin, I reached out to the quick start guide at http://a4t-api.alchemywebstore.com, and after setting the project and test deployment to my local Tridion environment, it was just coding in Javascript (using Anguilla) all the way until my plugin was finished.

Coming to my plugin, what is this all about?

So I was working for a client, who has 300+ publications to manage in Tridion and it is always a pain to navigate to the different publications in a "230 x 275" GUI box, using mouse. You always need be alert to spot your publication while scrolling, because it does pass in a split second. This goes even worse when you operate on a remote system and there is some lagging involved.
Imagine about a customer having some 1000+ publications, now who wants to be Tridion content editor ? :)

So to address this issue, I developed an alchemy plugin named "Publication Panel Search". The plugin introduces a Search Box in the publication panel as shown below in the image. On typing in the search box, the publication panel gets updated and publications are filtered based on the search string. So no more scrolling to find a publication :)


To summarize it in technical terms:

  1. Extend the dashboard resource
  2. On dashboard load event, get the tree control by  var treeControl = $display.getView().getTreeControl();
  3. Add event handler function "AddSearchBox" on "Draw" event of the tree control. like: $evt.addEventHandler(treeControl, "draw", addSearchBox); where addSearchBox function is responsible to add the search box.

The plugin can be downloaded from Alchemy Web Store and after installing on CMS, it's ready to use. It requires Alchemy as a prerequisite on your CMS server.

If you want to have a look at the plugin code, I've put it on Github here at https://github.com/saurabhgangwar/Alchemy-PublicationPanelSearch .

Thanks

Wednesday, August 19, 2015

DXA Installation - A Tip

This blog post is to fix the Error "No valid localizations are active for this site. Check the site log, and that you have the right localization IDs configured in cd_dynamic_conf.xml", While Browsing a DXA website for the first time.


By looking at the error, it's looks like a configuration issue in "cd_dynamic_conf.xml", but it's more than that.

To fix the issue:

Check the “cd_dynamic_conf.xml” and make sure that right localization ids for publications configured

Browse the "cd_dynamic_conf.xml" from location "{WebsiteRootDirectory\bin\config}", make sure you have your website entry in there as below:

<Publications>
    <Publication Id="123">
       <Host Domain="{domain}" Port="{port}" Protocol="http" Path="" />
     </Publication>

</Publications>

"123" is the publication id (in tridion) of your website 
"{domain}" is the domain for your website
"{port}" is the port


Binaries are set to publish to broker database

Make sure the binaries (multimedia files) are set to publish to the "Broker" database, In the storage config file.

The DXA website’s Application Pool Identity must have “write” permissions on the root directory of the website.

So when a page of a DXA website is requested for the very first time. DXA tries to creates a directory “BinaryData” in the root directory of the website. This directory is used to hold the binary data used in the website. So when a page is requested, DXA copies the binary data (used on the page) from boker database to this folder. And use the binaries for subsequent requests of the page. 
So to create a directory inside the website root and to copy a binary files to the directory from broker DB, The website’s Application Pool Identity must have “write” permissions on the folder.


Monday, July 13, 2015

Installing Alchemy Plugins for Tridion


Before installing an Alchemy Plugin, you must install Alchemy on your CMS server. Once finished, an Alchemy Plugin could be installed in two ways:


1. First one is to access the web store inside your Tridion GUI and install it clicking on install button. 
  •     Go to the Web Store by clicking the tab "web store" on Alchemy landing page, Search for the plugin you want to install.


  •     On the search result page, click the plugin you want to install


  • It will redirect you to the Plugin page, Locate to the "Install Plugin" button and click it

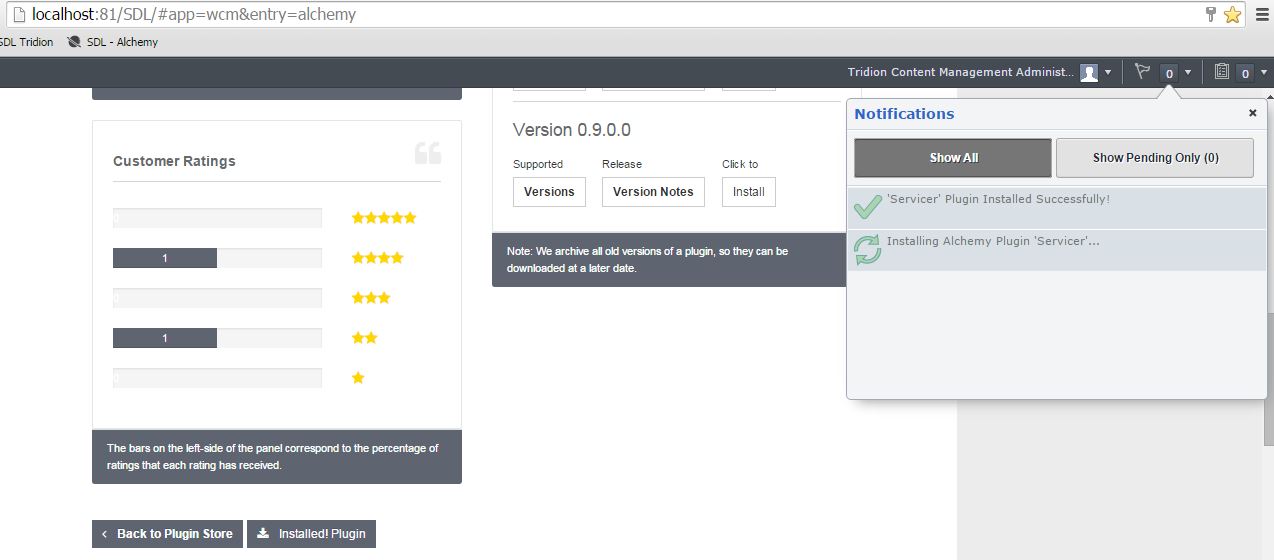
  • Watch the Tridion notifications about the progress


  • Great, your Plugin is installed and ready to use 


2. The other way to install a Plugin is to go to  
www.alchemywebstore.com and download the plugin (a4t file) and drag and drop it on the Alchemy landing page inside the Tridion GUI.


Installing Alchemy for Tridion (A4T)

As a Tridion developers we all know, Developing a Tridion GUI Extension is not a piece of cake. Form developing the code to the configuration, It's a complex process that requires some good technical skills and time.


So here comes Alex Klock and his team to rescue. They developed a system called Alchemy at Content Bloom, and the Beta version is announced recently.


Alchemy is basically a system set to revolutionize the way Tridion Extensions are built and installed. The system comprises of a open source extension framework to develop the extension plugins and a web store to upload/download and manage plugins.

So to use the Alchemy Plugins, First We need to install this awesome thing named Alchemy.


  • Run the installer on your CMS server

 Installation wizard starts


Specify the installation location for Alchemy


Specify the system admin credentials (Optional) needed for plugins like "Servicer", which performs some system administrative task like restating a window service. If you skip this, you can update this information post-install as well, these are stored in the "impersonation" node of the Alchemy.xml file found at: [Tridion Home]\web\Alchemy\Configuration\ 


Click Close once installation is complete


  • Refresh Tridion in browser. Boom!!! Welcome to the world of alchemy.


  • Click on the Alchemy link in left panel, it will show you the Alchemy landing page. And yeah, you are all set to install Alchemy plugins for the environment. 


Monday, May 4, 2015

Publishing Category keyword hierarchy as XML

Tridion Bite : Fetch taxonomies in RDF/OWL-Lite format from cms to improve performance.

Many a times, we need category keywords hierarchy as xml file on presentation server for different purposes. The common way to implement it in templating is to iterate through the categories and keywords structure to produce a xml document and add it as output.

This works great but this doesn't result in a good publishing performance. Especially if the publishing threads are limited and so other items keep waiting for publish in the queue.

So here is an alternative approach, which quite faster as compared to the previous one:
  • Use Repository.GetTaxonomiesOwl() method to get the taxonomies in a repository in RDF/OWL-Lite format.
  • Write a xslt to apply on the taxonomies results and add it as “Embedded Resource” in your templating solution.
  • Transform the xml (RDF/OWL-Lite) using xslt and add the result to the output.


1. Use Repository.GetTaxonomiesOwl() method to get the taxonomies in this Repository in RDF/OWL-Lite format:

We get the results like below:


from the cms structure:


2. Write xslt  and add it as “Embedded Resource” in your templating solution:

The xslt code:

<?xml version="1.0"?>
<xsl:stylesheet version="1.0"
xmlns:xsl="http://www.w3.org/1999/XSL/Transform" xmlns:owl="http://www.w3.org/2002/07/owl#" xmlns:rdf="http://www.w3.org/1999/02/22-rdf-syntax-ns#" xmlns:rdfs="http://www.w3.org/2000/01/rdf-schema#" xmlns:xsd="http://www.w3.org/2001/XMLSchema#" xmlns:tcmt="http://www.tridion.com/ContentManager/5.2/Taxonomies#" xmlns:tcmc="tcm:0-9-1/Categories#">

  <xsl:template match="/rdf:RDF">
    <publication>
    <xsl:apply-templates select="tcmt:Taxonomy"/>
    </publication>
  </xsl:template>

  <xsl:template match="tcmt:Taxonomy">
    <category>
      <xsl:attribute name="id" >
        <xsl:value-of select="@rdf:about" />
      </xsl:attribute>
      <xsl:for-each select="tcmt:rootKeyword">
        <xsl:call-template name="keyword">
          <xsl:with-param name="tcmId" select="@rdf:resource"/>
         </xsl:call-template>
      </xsl:for-each>
    </category>
  </xsl:template>

  <xsl:template name="keyword">
    <xsl:param name = "tcmId" />
        <keyword>
          <xsl:attribute name="id" >
            <xsl:value-of select="$tcmId" />
          </xsl:attribute>
          <xsl:attribute name="title" >
            <xsl:value-of select="/rdf:RDF/*[@rdf:about = $tcmId]/rdfs:label" />
          </xsl:attribute>
          <xsl:for-each select="/rdf:RDF/*[@rdf:about = $tcmId]/tcmt:childKeyword">
            <xsl:call-template name="keyword">
              <xsl:with-param name="tcmId" select="@rdf:resource"/>
            </xsl:call-template>
          </xsl:for-each>
        </keyword>
  </xsl:template>
</xsl:stylesheet>

Add it as "OwlTaxonomies.xml" to the solution as below:


Make the file a embedded resource by  selecting build action to "Embedded Resource" in file properties:


3. Transform the xml (RDF/OWL-Lite) using xslt and add the result to the output (The Example Code):


[TcmTemplateTitle("Generate Taxonomy Xml")]
    class GenerateTaxonomyXml : TemplateBase
    {

        /// <summary>
        /// Main function for TBB. Starting point of TBB code.
        /// </summary>
        public override void Transform(Engine engine, Package package)
        {
            // Call the base function to initialize the engine and package objects.
            Initialize(engine, package);
            Publication pub = GetPublication();
            var repo = GetPublication() as Repository;
            TaxonomiesOwlFilter fltr = new TaxonomiesOwlFilter(repo.Session);
            var taxonomies = repo.GetTaxonomiesOwl();

            // Load the style sheet.
            XslCompiledTransform xslTransformer = new XslCompiledTransform();

            //load the Xsl from the assembly
            Stream xslStream = LoadResourceAsStream("MyTest.TemplateBuildingBlocks.Resources.OwlTaxonomies.xslt");
            xslTransformer.Load(XmlReader.Create(xslStream));

            string strXmlListItems = taxonomies.OuterXml;
            StringReader srXml = new StringReader(strXmlListItems);
            XmlReader readerXml = new XmlTextReader(srXml);

            // Execute the transform and output the results to a file.
            StringWriter sw = new StringWriter();
            XmlWriter writer = new XmlTextWriter(sw);
            xslTransformer.Transform(readerXml, writer);

            package.PushItem("Output", package.CreateStringItem(ContentType.Xml, sw.ToString()));
        }

        private Stream LoadResourceAsStream(string resourceName)
        {
            var assembly = Assembly.GetExecutingAssembly();
            return assembly.GetManifestResourceStream(resourceName);
        }

    }

The Output:

<?xml version="1.0" encoding="utf-8"?>
<publication xmlns:owl="http://www.w3.org/2002/07/owl#" xmlns:rdf="http://www.w3.org/1999/02/22-rdf-syntax-ns#" xmlns:rdfs="http://www.w3.org/2000/01/rdf-schema#" xmlns:xsd="http://www.w3.org/2001/XMLSchema#" xmlns:tcmt="http://www.tridion.com/ContentManager/5.2/Taxonomies#" xmlns:tcmc="tcm:0-9-1/Categories#">
  <category id="tcm:9-5039-512">
    <keyword id="tcm:9-5256-1024" title="Level1 - Test Keyword1">
      <keyword id="tcm:9-5257-1024" title="Level2 - Test Keyword1" />
    </keyword>
    <keyword id="tcm:9-5258-1024" title="Level1 - Test Keyword2 - (localized)">
      <keyword id="tcm:9-5259-1024" title="Level2 - Test Keyword2" />
    </keyword>
    <keyword id="tcm:9-5260-1024" title="Local Keyword" />
  </category>
  <category id="tcm:9-5040-512" />
  <category id="tcm:9-5041-512" />
</publication>